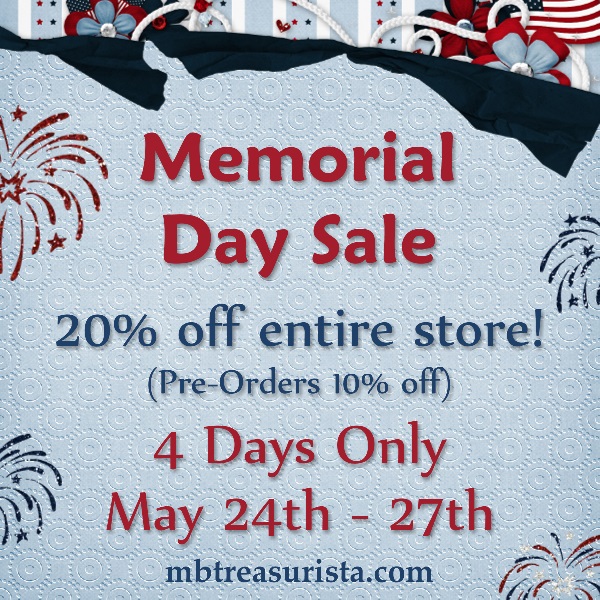
Tuesday, May 28, 2013

Teach Me Tuesday - Embellishments Galore


Hello MBT Fans,
It's Tuesday and you know what that means here at MB's Treasurista, that's right! Another Teach Me Tuesday Tutorial. First we've got a bright and beautiful canvas by Pernilla Svalborg. Then Deb Edwards has a splendid video tutorial that shows you how to make your own spray featuring several MBT goodies. So we've got sprays, a canvas and a tutorial!

Here is what Pernilla has to say about how she created this Mixed Media Canvas:

So this is my first shot at a mixed media canvas.


This was meant to be my project for the youtube hop MB's Treasurista hosted previous this month, but those of you who remembers, the requirements where white with a splash of two colors.

Let me tell you thou, there are only two colors, but I gessoed the canvas as to prep it and then I wanted to mod podge the spray. I have no idea what happened, but firstly, I could see the spray react with the gesso and when I had managed to even that out it was very much lighter than the peach spray I had in mind. As I also had intention to spray it with green Lindy's i wanted to seal it. So naturally, the color reacted with the sealing as well and there, I had yellow for some reason?! On a try-out the sealing didn't work wonder so I had hopes that I would be able to correct it when I sprayed away later (when everything was glued down), but don't you think that now, why not, the sealing worked and nothing would stick to it...

Oh well, it grow on me after a while and now I'm almost liking it :D

Drink me silly My mojito green & fuzzy navel peach
Nantucket pearls  Cape cod coral
Mermaid seashell Opal sea green, Seamint green & Cocklebells coral

Tim Holtz Catalog
Game spinners
Word Keys
Swivel clasp
Key holes
Hinges fasteners
On the edge die, ornate
Texture fades, damask

Loving all the dimension and details Pernilla! Next, we have a cute embellishment idea made by Deb Edwards!


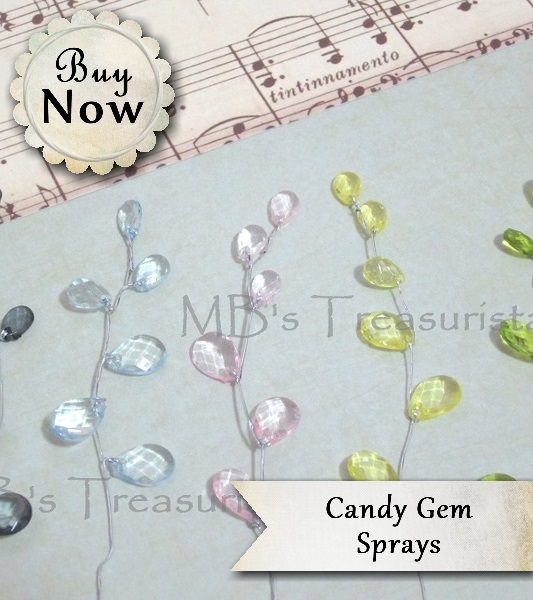
Today I would like to share how I made this fun and simple flower spray using products from MB's Treasurista. I cut about an 8 inch piece of Moss Rustic Wire, curled the bottom of the stem for stability when gluing to your project.

 Then I just wrapped The White Small Pearl Spray around the Moss Rustic Wire . Then added the Candy Gem Spray and continued to wrap.
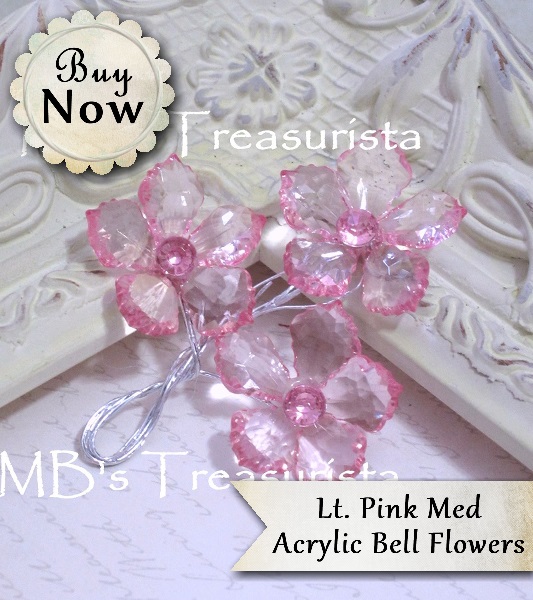
With the product from MB's Treasurista I made this simple and Lovely Spray... I hope ya'll like it and will try to create this for yourself... 
The Spray would look awesome on any project that you may be working on....

Here is the link to the store http://mbtreasurista.com

Here are a few still pictures for you to see up close:


What a gorgeous spray. We hope you all had a lot of fun on today's blog! We want to thank Pernilla and Deb for their amazing work and tutorial! We hope that today's creation will inspire you create your own embellishments and take a crack at Mixed Media! Please come back and join us tomorrow for more amazing craft inspirations, we have lots of eye candy and a tag tutorial to share here on our blog tomorrow! 

We always encourage you to post your creations to our Facebook page or Craft Community! We'd love to see what you've been creating with MB's Treasurista! 

MB's Treasurista Facebook

"Creating the Crafty Life" Craft Community

Happy Crafting,
Your Friends at MB's Treasurista


Visit MB's Treasurista

pinterest blogger facebook youtube

Saturday, May 25, 2013

Memorial Day Sale and More.....


Have you seen the
New Products and New Colors for May?
If not take a look below!

Flat Backs/Cabachons, Sprays & Flowers


Lace & Trim


Now Available for Pre-Order
(10% off)


Get crafty, creative, and inspired!!! Join our craft community (Creating the Crafty Lifethis Sunday, May 26th for our Country Garden Youtube Hop! Grand Prize for just hopping along are some gorgeous color shot sets by Lindy's Stamp Gang!


The grand prize winners for the MBT's Mixed Media w/ a splash of color Youtube Hop is Tiffany Solorio & charitym123. Congrats! Please contact me at mbstreasurista@gmail.com to claim your prize!

*Please note that product prices and availability are limited time offers and are subject to change. Prices and availability were accurate at the time this newsletter was sent; however, they may differ from those you see when you visit mbtreasurista.com. Cannot be combined with any other offer. Orders $75+ to US zip codes will qualify for free Standard Shipping, some exclusion apply! Sorry, promo codes and offers not valid on previous orders or gift cards.


Have a great Memorial Day Weekend from all of us at MB's Treasurista!!!

Visit MB's Treasurista

pinterest blogger facebook youtube

Tuesday, May 21, 2013

Teach Me Tuesday - Creative Gifting


Hello MBT Fans,
It's Tuesday and you know what that means here at MB's Treasurista, that's right! Another Teach Me Tuesday Tutorial by Pernilla Svalborg! Today's crafts highlight some very gorgeous ways to give gifts and ditch those gift bags. We will also have 2 cute projects by Kelly Peters. So we've got gifting in a creative way, a card and a tutorial! Plus we have a winner to announce for our Mixed Media w/ a Splash of Color Youtube Hop! What a great day on our blog!!!

And now it's time to announce our youtube hop winners...


$20 Gift Card

Surprise $10 Gift Card

Congratulations, Ladies! Please send me a confirmation email with your email address at mbstreasurista@gmail.com, to claim your gift cards. 


Here is what Kelly has to say about how she created this minty card and gift basket:

I was looking at pinterest and they had this really cute idea where you buy a bunch of "MINT" themed items and you make a card that says "You were MINT to be my teacher" which is just so corny but adorable. We needed a gift for my daughter for her teacher and so this was just perfect for us to re-create with MBT goodies. ~Kelly 

Here is my take on it:


Materials used for gift basket: 
1. GO shopping for Mint treats
2. I used the basic grey clipping stack to make the lollipop sign
(You can do any style take on this with rosettes or just a circle punch like I did with a spellbinders outside)
3. I used my leftover alphabets for the saying
4. Butterfly mesh embellishment from Mbtreasurista
5. Ribbon for front of basket and tissue paper

Mbtreasurista Materials used for card:
White wide scalloped lace
Mint Eyelet Lace with ribbon
Black ruffled satin lace
Mint green pearl heart drop trim
White satin trim in the large size
White daisy venice lace #02
Petaloo darjeeling flower
Green butterfly mesh embellishment


Just adorable! Next, we have a wonderful gift decoration idea and tutorial from Pernilla Svalborg.


Hi everyone!

I'm sharing my way of giftwrapping bottles today.
Don't you just think that the gift bags for wine bottles are just boring and dull?
And it's not that it's a surprise when you pull out the bottle, the bag pretty much says it all.
Yet, it's so easy to bring a bottle of nice wine as a gift for the hostess - instead of a flower.

So I came up with this easy way of altering the bottle, without ruining the label.

The first time I did it I used layers of paper and stamped the sentiment. MB's Treasurista has amazing wide lace, which I used instead of paper. You can compare HERE.

But this is all it takes:


To become this:


Here's how I did it:

As I wanted to use lace instead of paper, I still need to back it with paper. This is just to prevent the glue from sticking to the bottle. You want to keep the wrapping removable.

To make the lace wrapping I set the edges with eyelets using my crop-o-dile, just eyeballing how many and the width in between them.

I then place everything that I need a flat surface for. If I'd used paper instead of leaves, this is when I would stamp the background or distress the edges.

I then lace the wrapping around the bottle with ribbon and twine. Making sure it's tight enough not to slip and then I tie a bow.

Now it's just to glue everything to the wrapping with your glue gun - that's it, easy peasy!


Thank you for visiting!
You can watch me as I make the bottle with the mesh bling in brown from start to finish below:


Products used from MB's Treasurista:


What beautiful gift wrapped wine bottles. We hope you all had a lot of fun on today's blog! We want to thank Kelly and Pernilla for their amazing work and tutorial! We hope that today's creation will inspire you all to create a creative decorated gift for someone special! Please come back and join us tomorrow for more amazing craft inspirations and fun ideas! 

We always encourage you to post your creations to our Facebook page or Craft Community! We'd love to see what you've been creating with MB's Treasurista! 

MB's Treasurista Facebook

"Creating the Crafty Life" Craft Community

Happy Crafting,
Your Friends at MB's Treasurista