Friday, August 26, 2011

Altered Picture Frame

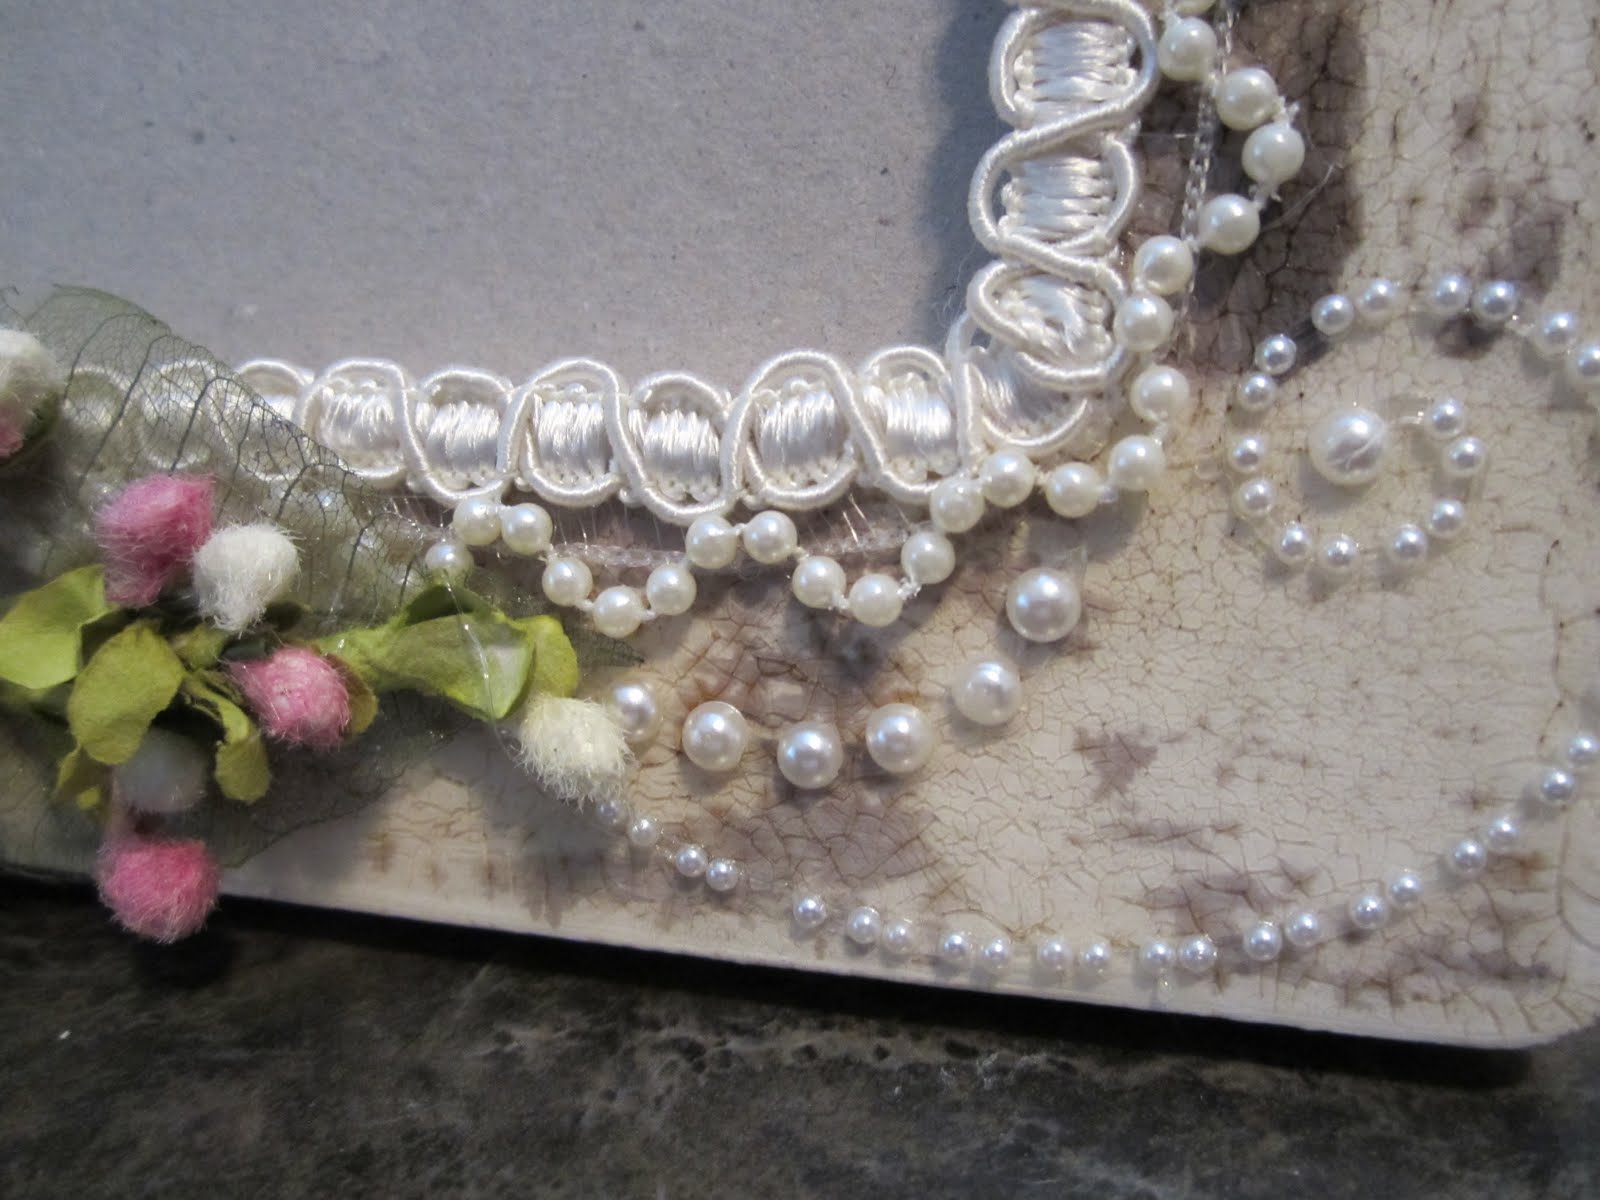
Hey everyone! I'm here today with an altered frame that i made for Terri! This was for a swap that i hosted and was so happy to have Terri as my partner. There will be another Altered Frame Swap coming up in November over at Creating the Crafty Life. Please come on over and take a peek.

For this frame I used a $1 wood frame from Michaels. What an awesome deal as i even got it on sale 3 for a $1! The paint is white acrylic, and the crackle was made using the Deco Art One Step crackle medium. I used walnut reinker to add the weathered look, by using a few drops on each side and wiping the ink all over then off, leaving it in the cracks and random spots. The gorgeous pearl trim is from my stash and may even be coming to my shop :) All the leaves, roses and flowers are from iamroses. I used Starburst Sprays from Lindy's Stamp Gang to color all the iamroses flowers. The white rose buds were painted with Perfect Pearls by ranger. The sprays coming out of the flower bouquet were made using floral picks from Hobby Lobby. I finished it off with some Say it in pearls by Prima.


Thanks for dropping by to check out my project!
Have a wonderful crafty day!
♥Misty♥

Tuesday, August 23, 2011

Tipsy Tusday - Distressing


Hey, i know its been a couple weeks since i did Tipsy Tuesday. But i got a good one and probably my favorite one of all this week, Distressing! In some way, form or fashion, i tend to distress all my projects. I think distressing even just a touch gives projects more depth and a finishing touch. If you love vintage or shabby chic, then these tips and techniques are just perfect for you.


Distressing with Ink:
I tend to use different ink colors depending on the colors of my card, poject or layout.
  • The most easiest is to ink all the edges. Any ink will work, but Tim Holtz Distress Ink is the best for me. Some people like to use smaller ink pads instead of a full-sized pad or a inking tool. Such as Tsukineko Dew Drop pads which are a pigment ink or the Memento Dew Drops which are a dye-based ink. For this you are only inking the edges so you just get a darker boarder around your project and don't need any tools to do this. Just run the ink pad along the edge of the paper, and it gives it a very fun look. 
    • Just be careful if you have a really juicy pad that you don't get ink anywhere you don't want it.
  • My favorite way to distress without tearing up the edges are to ink using the tim holtz blending tool with the foam pad. I like to start by holding the paper in one hand, inking up just the corner of the pad and then hitting the edge in a downward fashion, tiny sections at a time, but very quickly, giving a feathered look to the edges, the more you do this the darker it will look.
    • Make sure your pad isn't too juicy or you will get too much ink in the very first spot and will have to keep blending the other areas to match.
    • Don't worry if your pad isn't very juicy, just mean you will have to ink up your pad several times.
  • If you want a large blend and to distress more than the edges, use the same tool. With the paper on a surface that can be cleaned easily as you will get some ink on your table, Start from the edge at a slight angle of the tool and go in a circular motion counter clockwise until you get your desired look.
    • Be careful you don't go into too far as you can't take it back.
    • You can use this technique to give a faded look around photos or images as well.
  • You can crumple the paper and then go over it lightly with your ink pad giving a plain piece of paper a completely distressed look.

Dry Distressing:

There are many ways to fray the edges, using many different tools the market has to offer. Her are a list of some tools you can use and what kind of finish they give.
  • Sandpaper: Can give two different edge finishes. You can get a soft edge by sanding the top outwards with about a 400 grit sandpaper. The next is sanding the edges in a back and forth motion giving it a ruffled frayed look with about 200 grit works best. 
    • You can use plain sandpaper sheets in your hand or nail files, sanding blocks, or tools such as tim holtz sandpaper block that holds sandpaper sheets.
  • Distressing tools: These tools are for fraying the edges but are much easier to use than sandpaper.
    • To "dry" distress my paper, I usually use the tim holtz paper distresser. I put my paper into the slot and start at the top corner of one side and "scrape" it back and forth along the edge of the paper. You will get used to how firmly you need to do this. I then continue around the paper distressing all the edges. 
      • Try your tool out on a piece of scrap paper first. 
      • Different paper weights will require a different amount of pressure.
      • Be ready for the paper mess. You will probably get a little messy from the paper dust but the effect is so worth it.
    • There is also the zutter Distrezz-it-All which is an electric distresser. With this you can distress multiple papers at the same time with just a simple pass. You can also distress chipboard with ease like butter. I can't wait to get this tool :)
  • Tearing: You can tear the edges. There are many rulers out there that are made for soft tearing and give you tons of designs. You can try just tearing against any flat item and see how it turns out. Or just fussy tearing it however you wan to more your hand.
  • Torn: This look i like to use alot. just tear into the paper then kinda curl each torn piece. You can ink all the edges of the torn pieces and this gives your paper a very aged look.


Fire/ Heat Distressing:
  • Distressing with fire can be dangerous and is for adults only!!! I use a lighter (Never use matches)!! Hold the flame about an inch or more away from the edge of your paper so you don't set it on fire. Go back and forth in a slow motion along the edge until the edge starts to brown and and singe. This gives projects a very old look and you can do this after applying ink as well.
    • Try on scrap paper until you get used to doing it and find the desired effect you are going for.
  • Heat Gun (This is safer): You can get the same effect with your heat gun, you just have to go slower for it to heat up the edge of the paper. I would also hold it a bit closer, be careful as it gets very hot and holding it too long will turn the paper brown fast.
    • Try on scrap paper until you get used to doing it and find the desired effect you are going for.

There are many ways to distress your projects, these are just the most common ones. Experiment with tearing, crumpling, scraping, inking, burning and any combinations of those things to give depth and even age to all your projects, trust me its worth the extra effort and its just plain fun!!!


Thanks and tune in next week for more tips and techniques. 

Have wonderful crafty day!!!
♥Misty♥

Tuesday, August 2, 2011

Tipsy Tusday - Storing your Bottled Products

There are many ways to store all your bottled products, such as Sprays, stamp cleaners, glossy accents, paints, water squirt bottles, etc.... These are the ways i store some of those products. 

I store my glimmer mist on one shelf on 2 of those making memories embellishment center storage units. You can see on the right a photo of one of my storage centers. i got mine at Michaels. You can also store all your other bottled products on here. I just love this thing!!!!


  • All my lindy's mist and stains are stored on one of those rotating metal racks for acrylic paint storage.
  • All my acrylic paints are also stored on the same rack. 
  • I also store all my Adirondacks paint dabbers on the opposite side of my paint. You can get this at michaels! View picture on the right:


    I store all the things i want at hand at my work station in a cropper hopper table storage rack. In this rack i keep things such as walnut stain sprays, glossy accents, stamp cleaner, and water squirt bottles. You can also fit some spray adhesives, glimmer sprays, paints...etc. I really like this unit and am considering to get another one You can get this at joanns.com View picture on the left:


    • There are many other ways to store bottled products like on shelves or in drawers. Let me know how you store these types of products and whats your favorite way!

    Thanks and tune in next week for more tips!!!
    Have a wonderful crafty day!!!
    ♥Misty♥

    Wednesday, July 27, 2011

    Tipsy Tusday - Stamping Part 2

    This week we will be talking about stamping. Ok so i know many of you use stamps So i will start with some tips on using and then storing different types of stamps:

    Using Stamps
    • First when using a brand new stamp you want to ink it up real good and stamp on a scrap sheet of paper, do it a couple times before stamping on your project. This will get rid of any left over manufacture residue on the stamp and make it a more crisp, even and clean. I learned this tip from Michelle!
    • If you have done the tip above and you still get part of the stamp that just doesn't want to stamp. Try stamping with a note pad under your paper and apply even pressure all over the stamp, don't push too hard cause you may smear the image.
    • Another thing you can do is to place you stamp with inked side up on a flat hard surface, place your paper on top and run a brayer over it while gently holding the paper in place. This tip is more difficult, but if you have a stubborn stamp and the note pad does help you can try this.
    • Make sure you clean your stamps after use and as soon as possible to get all the extra ink off and keeping your stamp conditioned.


    Storing Stamps:

    • I store my stamps 2 different ways. The first way is in a 3" 3-ring binder with base ball card holder sleeves. Yes the pockets are small but they are perfect for the small studio g stamps and inkadinkado and others like it. You can also purchase sleeve protectors for photos that have a variety of sized pockets. I get my pockets from office depot. The cheap trick is to wait for a sale or get a rewards card and then you get a discount on your purchases along with coupons that may be available online or in the mail.
    • The second way is on a clip it up system. I also get sleeves from office depot that are for storing dvd's and cut them in half. i use these for all my tall stamp sets like inkadinkado. I place a label on the bottom of the sleeve of the name and company. I currently store my rubber cling stamp in there original packaging on the clip in up. You can get a clip it up at many places, i got mine at ScrapbookWarehouse.com.
    • The other way i'm gonna switch to doing my rubber cling stamps is in a 3-ring binder. They make special plastic like sheets that go in binders that you can place your stamps right on and place a label on it at the top...more to come on this once i get it done. I got these sheets at ScrapbookWarehouse.com.  I will take pictures☺
    • Another way some people store there clear stamps are in clear cd or dvd cases. The stamps will cling right to the plastic.
    • I store all my wooden stamps in several 6 drawer 12x12 cubes from ScrapnCube.com. They are seperated by themes.

    Thanks and tune in next week for more tips!!!
    Have a wonderful crafty day!!!
    ♥Misty♥

    Sunday, July 24, 2011

    Now open new crafting community!!!

    I'm so excited to introduce 
    a new crafting network
    *Creating the Crafty Life*


    Please come and join if you have a 
    passion for crafting and want to 
    share and connect with others 
    while crafting and you may even 
    make some friends along the way :)

    We have challenges, swaps, 
    discussions, live crops, shops, 
    and many more fun and 
    exciting things to come!

    Membership is free so come on 
    by and take a look!


    Have a wonderful crafty day!
    Misty♥

    Thursday, July 21, 2011

    Tipsy Tusday - Stamping Part 1

    I know this is a little late this week and not on my youtube. But i'm sure you can forgive me...lol This week we will be talking about stamping. Ok so i know many of you use ink pads and some sort of stamps. So i will start with some tips on using and storing your ink pads:

    Inks
    • Try and store all your ink pads so the pad part is level and upside down. Let gravity do the work and make the pads nice and juicy. This prevents uneven ink distribution as well.

    • If you use Tim Holtz Distress Inks and the inking pads. Store the pads with velcro on the bottom of the ink pad. This makes them easy to find and color coded.
    • To prevent your stamp pads from becoming muddy, clean your stamps when changing colors
    • I like to store mine by brand and then type like dye, pigment, chalk....etc. But you may find it easier to store my color.

    • For my craft space i store most of my ink pads in 2 different drawers (the ones i don't use the most). The ones i use the most (in my case the momento tuxedo black ink and distress inks) are stored on a ink pad caddy made by cropper hopper right on my desk for easy access.
    • Other ways you can store them are in old cassette tape holders or there are ink pad holder specifically made but these do run pricey. You can find cassette tap holders in many styles including rotating and on ebay, in thrift shops, flea markets and garage sales for penny's on the dollar.


    Thanks and tune in next week for more tips on stamping. Next week i will be covering tips on storing your stamps!

    Have wonderful scrappy day!!!
    ♥Misty♥

    Thursday, July 14, 2011

    Tip of the week?

    Hey wonderful people!!!
    Last year i had started a series on my youtube channel for "tip of the week". I wanted to start that back up starting next week. The tip of the week would be about things like, storage, deals, crafty tips, product reviews...etc. I'm not sure how i want to break it up cause i also want to do one tutorial each month. But i may do a series called "Tipsy Tuesday". It will be on my youtube and here on my blog. Let me know what you think and look for it starting next Tuesday!!! 
    Have a wonderful day!


    Much love and hugs
    ♥Misty♥